

Run It on a Schedule
Wire your connectors and transformation into a single flow, run its tasks in parallel where possible, give it a schedule, and get notified when it fails.
The answer in that sheet is true this morning, because you ran every step by hand. Tomorrow it is a screenshot. A flow chains your three configurations in the order each one needs the last and runs them on a schedule, so the answer keeps up with the pipeline without you. Step 5 of the Getting Started arc.
Two ways to do it — pick a tab in Set it up below. Running it, scheduling it and setting notifications come afterwards and are yours either way.
What you need
Section titled “What you need”Everything from the previous steps, in one project:
- the
[TUTORIAL] Octopus sightingsHTTP configuration from Get Your Data In, - the
Octopus atlastransformation from Transform Data, - the Google Sheets destination from Deliver the Answer.
Phases and tasks
Section titled “Phases and tasks”A flow is a list of phases. Each phase holds one or more tasks — a component configuration to run, a notification to send, a variable to set.
- Tasks inside one phase run in parallel.
- Phases run one after another, and the flow only moves on when a phase is finished.
That is the whole model, and it makes the ordering obvious: things that can happen at the same time go in one phase; things that depend on each other go in separate phases. Your pipeline is three phases — extract, transform, deliver — because the transformation needs the four tables before it can join them, and the sheet needs the joined table before it can deliver it.
Each phase here holds a single task, so nothing runs in parallel yet. Parallelism shows up the moment you have a second source: two connectors both go in phase 1 and run at the same time.
Inside your HTTP configuration the four tables are already fetched by one job — row-based components like this one can be parallelized internally.
To add that second task to a phase that already has one, hover the phase and click the + in the small toolbar that appears on its top edge — it opens the same Add Task menu as an empty canvas (Component, Notification, Variable), scoped to that phase. Do not confuse it with the + below a phase, which starts a new phase instead. That toolbar belongs to the phase; the one that appears on the card itself is the task’s, and carries Run task and its settings.
Flows can also branch on what happened: retry a task, take a different path on failure, end early. That is conditions, and you need none of it yet.
Set it up
Section titled “Set it up”Building a pipeline out of configurations you already have is a documented Kai job (Complex Workflows), and the Builder has it wired in: Build with Kai sits in the Add Task menu on an empty canvas, and Modify with Kai in the flow’s header once it has tasks.
Create a flow called "[TUTORIAL] Octopus pipeline" that runs my "[TUTORIAL] Octopus sightings"HTTP configuration first, then the "Octopus atlas" transformation, then the"[TUTORIAL] Octopus atlas to Sheets" destination — three phases, one task each, in that order.If you skipped step 4, drop the third one and ask for two phases.
Check: the canvas shows three separate phases, not three tasks in one. Each step needs the previous one’s output, so the split is the whole point, for the reason the section above just gave. If it came out as one phase, the fix is the one the numbered steps use — switch to the Do it yourself tab: the + below a phase starts a new phase — add the later tasks there and remove them from the first.
Set the schedule and the notifications yourself afterwards, in the flow’s own Schedules and Notifications tabs — the sections below the tabs. Both are two clicks, and they are the part people forget exists — a flow nobody scheduled and nobody gets told about is just a button.
Build the flow
-
Open Flows in the navigation. In projects that have both kinds the section is titled Conditional Flows, which is what these screenshots show. Click Create Flow. Name it
[TUTORIAL] Octopus pipeline, add a description, and click Create Flow again in the dialog.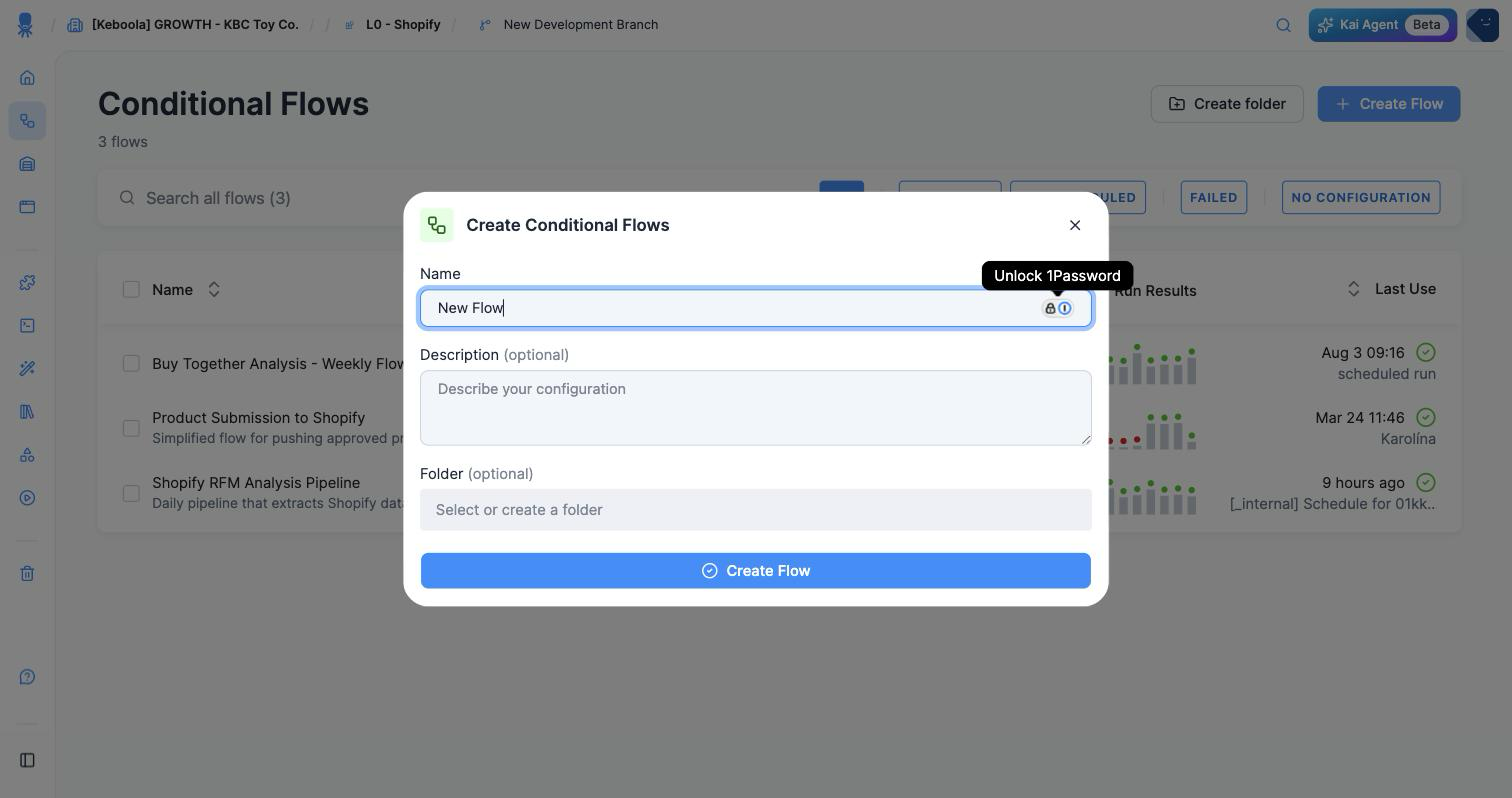
-
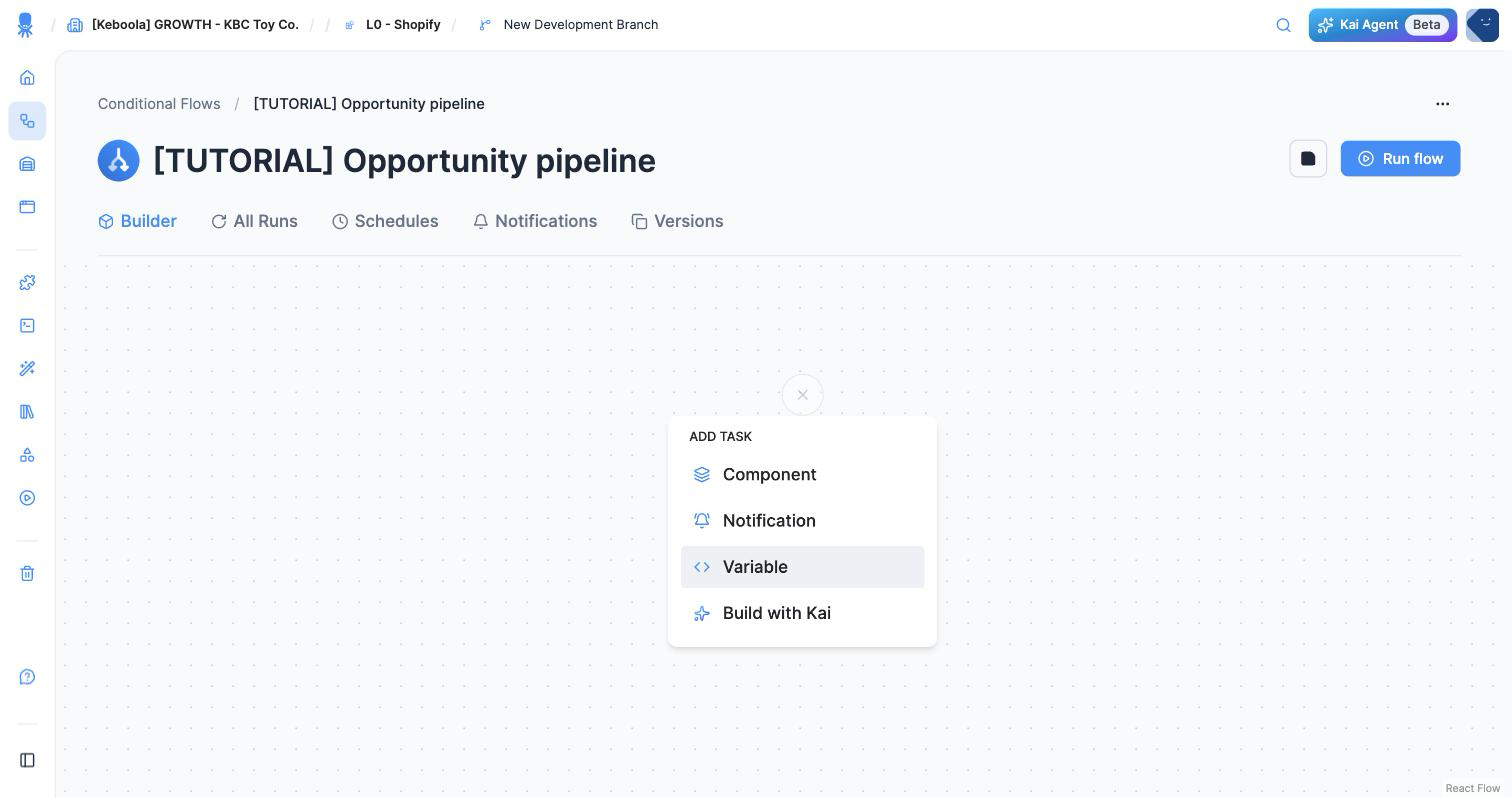
You land in the Builder on an empty canvas, with an Add Task menu already open: Component, Notification, Variable and Build with Kai. Choose Component.
-
Select Component opens. It lists what the project has, with a configuration count each — pick HTTP, then the
[TUTORIAL] Octopus sightingsconfiguration. It drops onto the canvas as a task inside a box labelled Phase 1.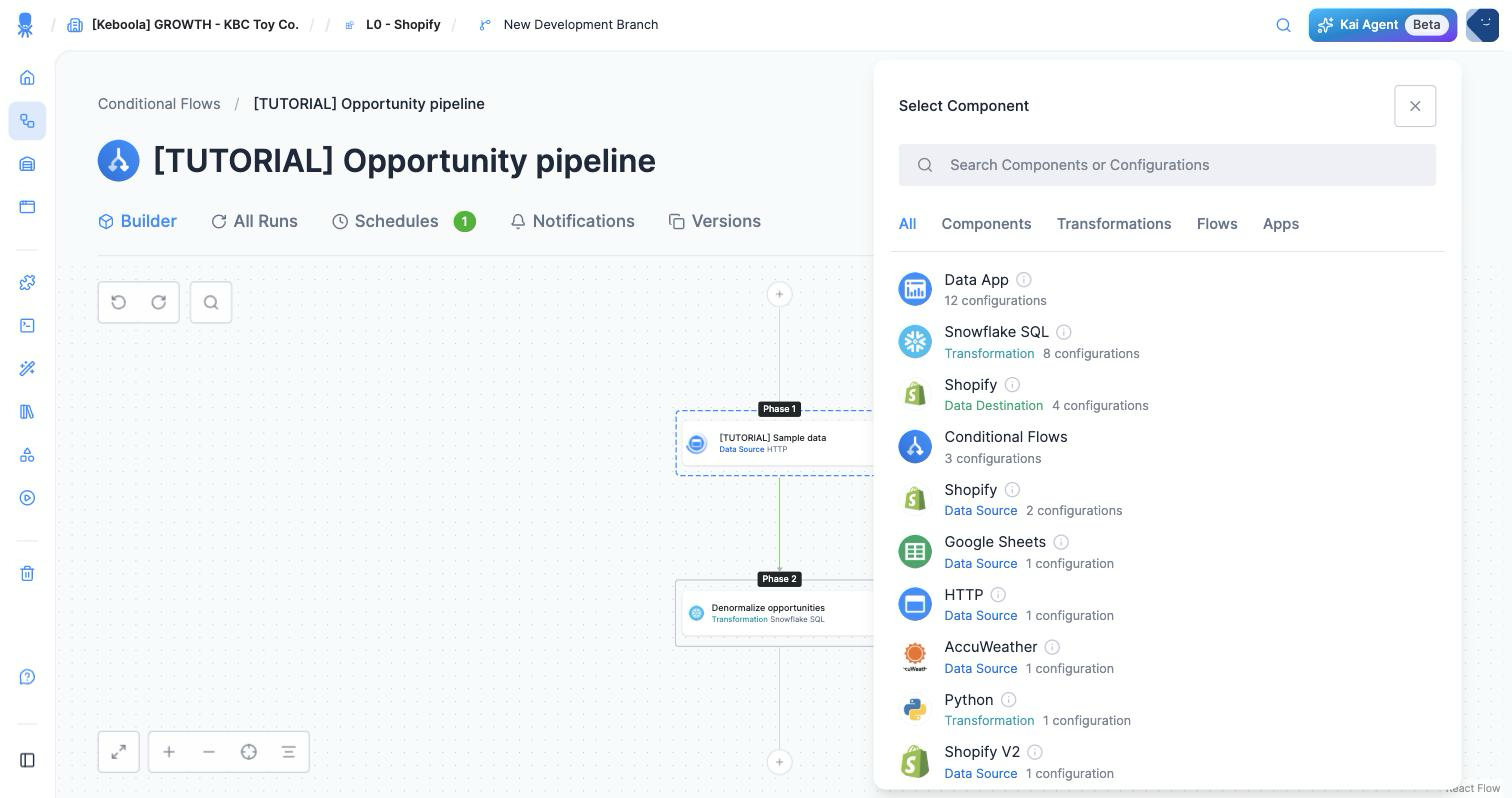
-
Click the + below Phase 1. That is the control that starts a new phase — the plus between phases adds a phase, not a task to the one above it. Add the
Octopus atlastransformation there. Being in a later phase is what guarantees the tables have landed before the SQL runs.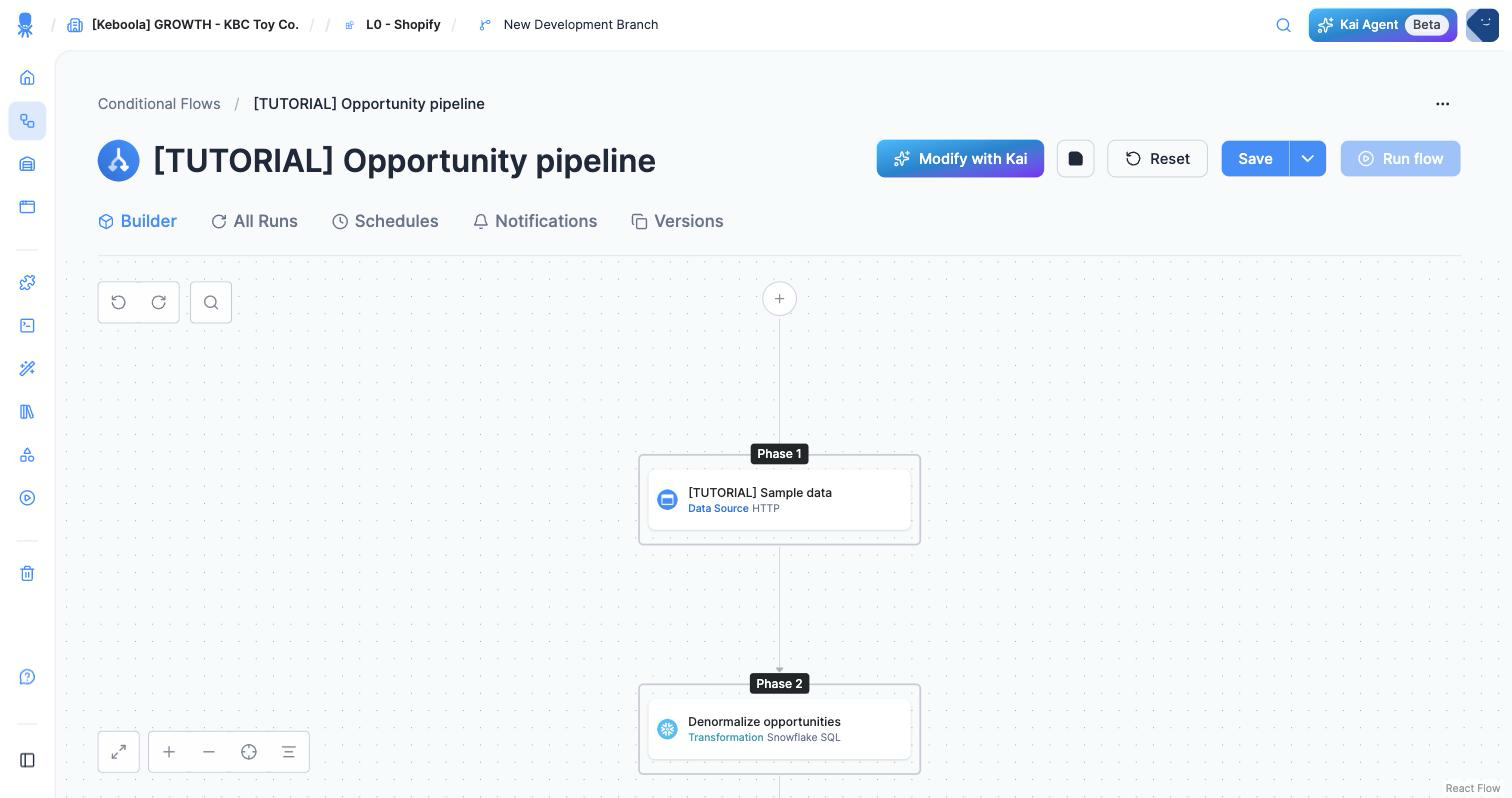
-
Repeat for a third phase holding the Google Sheets destination configuration. If you skipped step 4, stop at two phases.
-
Click Save. The Builder keeps your changes as a draft until you do — Save and Reset only appear while there are unsaved changes, and Run flow stays disabled until you save.
You now have three phases: the load, then the transformation, then the delivery.
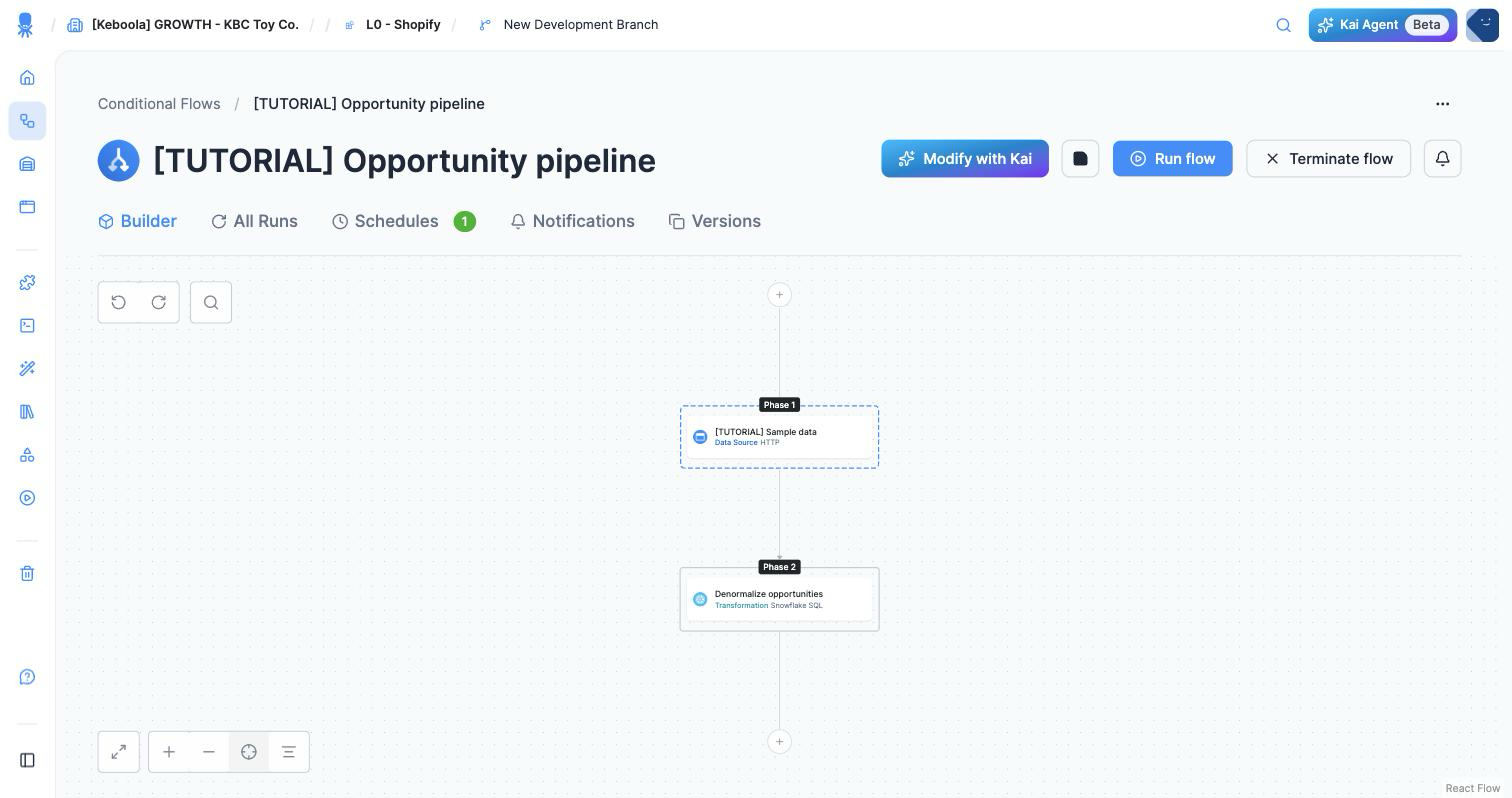
The capture above shows the first two phases; the delivery phase sits below them, off the bottom of the frame.
Run it
Section titled “Run it”If Run flow is disabled, the Builder is still holding your changes as a draft — click Save first. That applies however the flow got built, including when Kai built it for you.
Click Run flow and confirm with Run. A Conditional Flows job has been scheduled notification appears with a Show job link, and while the run is in progress the header offers Terminate flow.
Every task creates its own job, so Jobs tells you exactly which step failed if one does, and the flow’s own All Runs tab shows each run with its phases.
Set a schedule
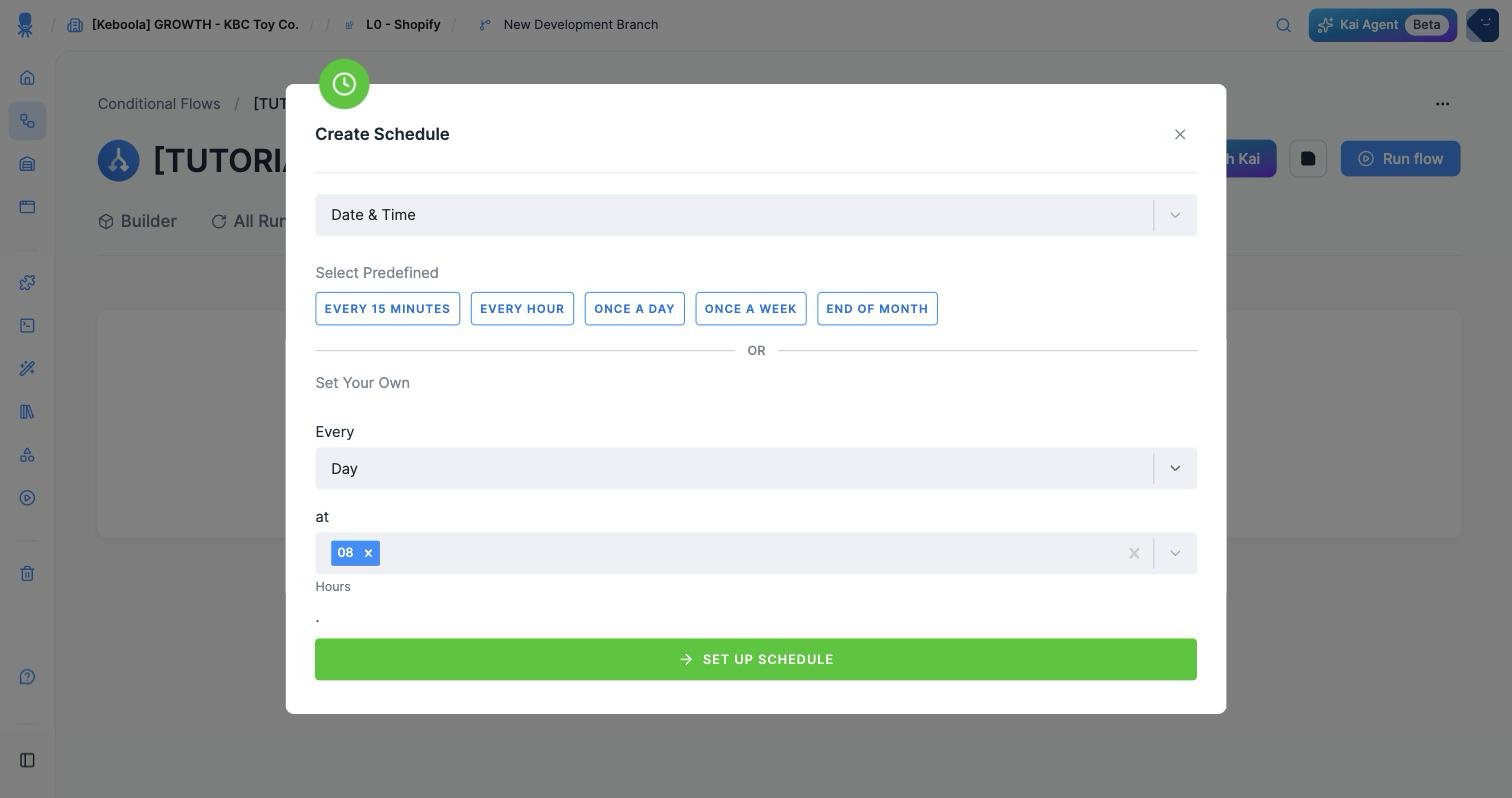
Section titled “Set a schedule”Open the flow’s Schedules tab and click Create Schedule. Choose Once a day — that matches the daily pipeline this guide set out to build. The other predefined intervals are Every 15 minutes, Every hour, Once a week and End of month, or set your own under Set Your Own (every day/week/month, at an hour and minute you pick). Then click Set Up Schedule.
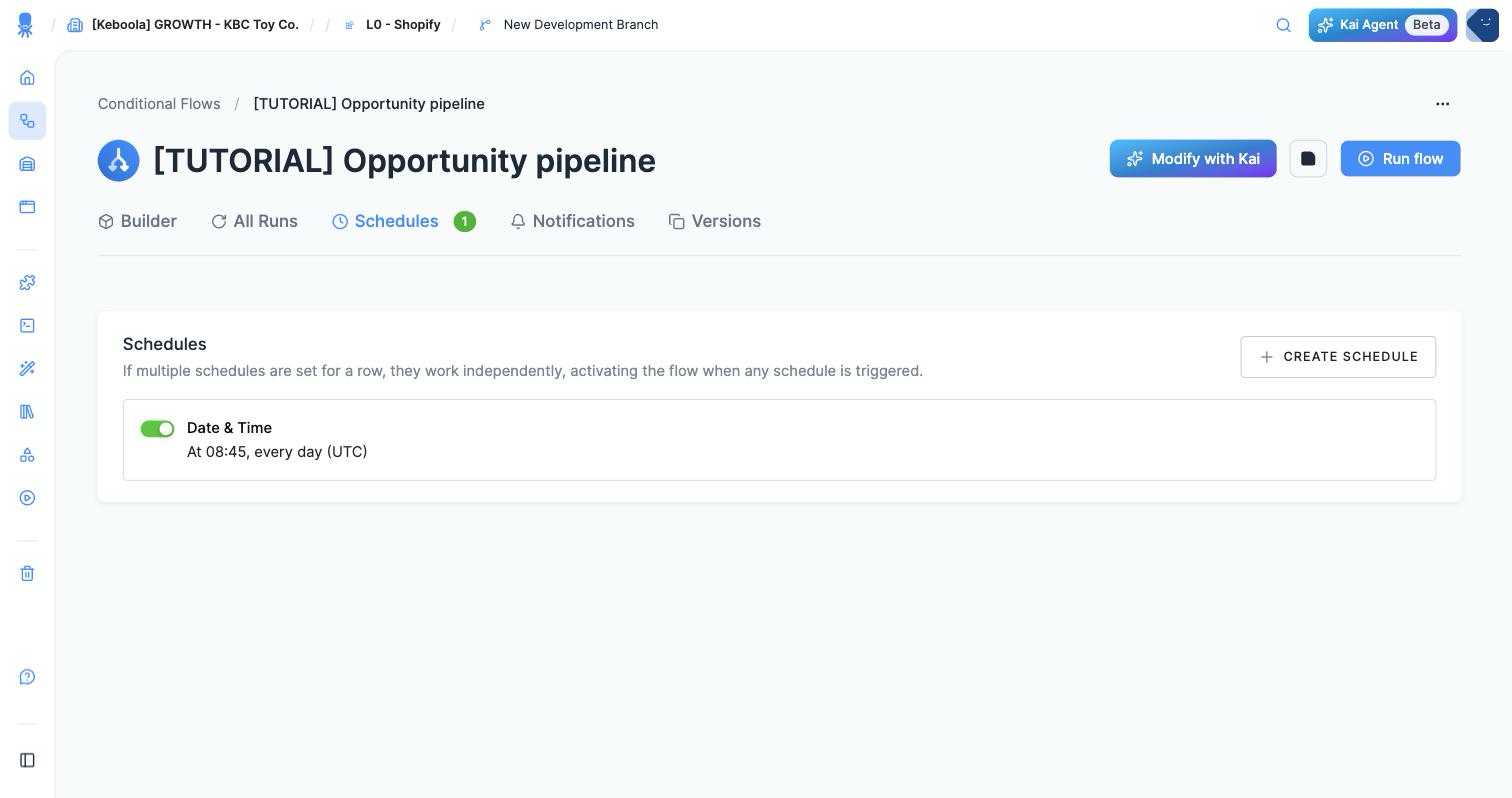
The schedule appears in the tab with a toggle, so you can pause it without deleting it, and the
tab shows a count. A flow can hold several schedules: they work independently, and the flow
runs whenever any of them fires. The schedule I set showed as At 08:45, every day (UTC), so
check the timezone the list displays before relying on it.
If you share a stack with other projects, scheduling slightly off the hour avoids the busiest moments. A schedule can also be driven by a table changing rather than a clock — see Schedule and Automate.
Get told when it breaks
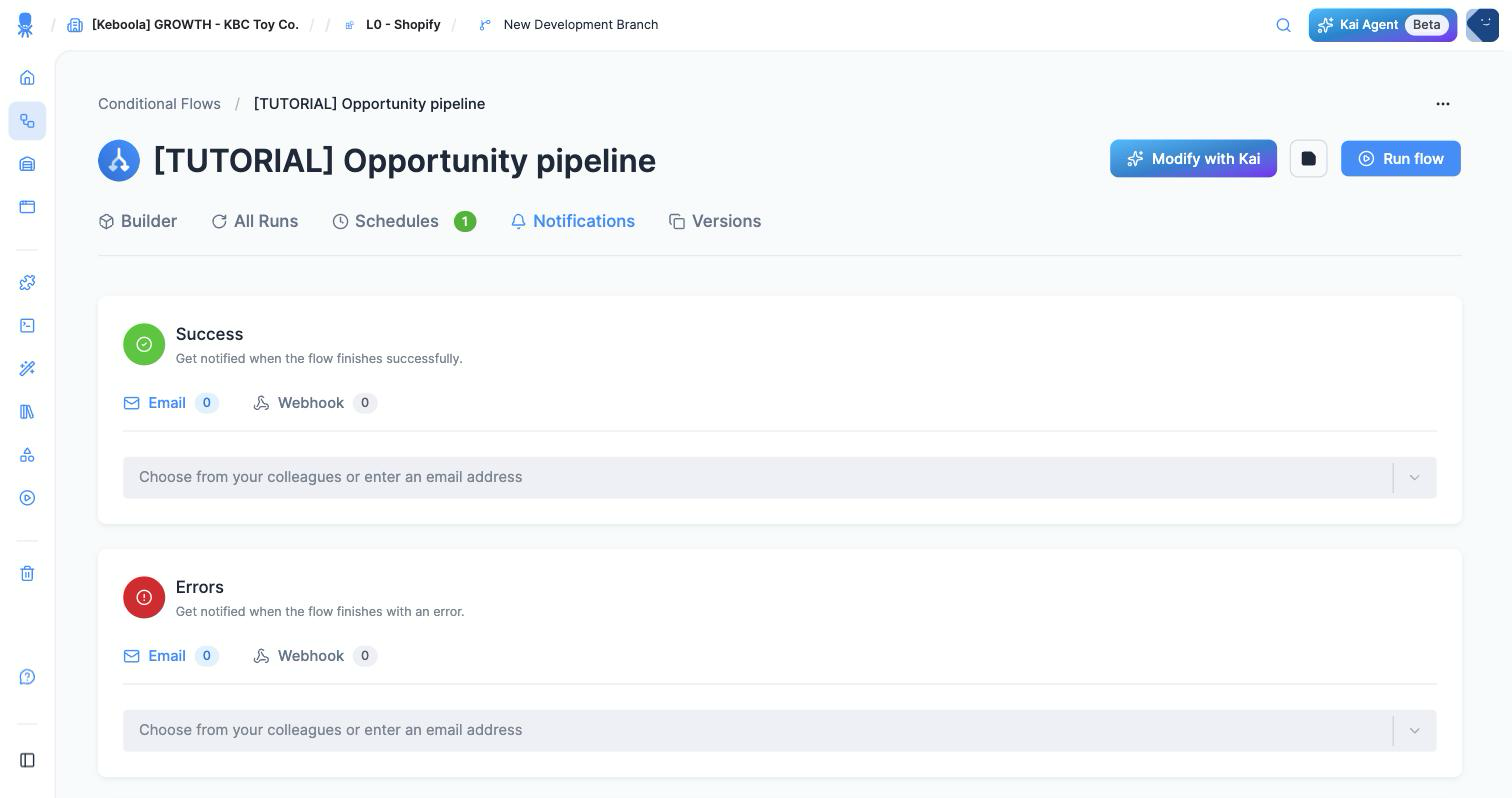
Section titled “Get told when it breaks”An automated pipeline that fails silently is worse than a manual one. Open the flow’s Notifications tab — there is nothing to click into, you edit it in place. Three cards:
| Card | Fires when |
|---|---|
| Success | the flow finishes successfully |
| Errors | the flow finishes with an error |
| Processing | the job runs longer than usual, by a percentage you set |
Each takes Email addresses (pick colleagues or type any address) or a Webhook URL. Fill in Errors at minimum — on a scheduled production flow that is the one setting nobody should skip.
There is a second, finer mechanism: a Notification task placed inside the flow, driven by a condition such as if any task in the flow ended with an error. That is what you reach for when one flow needs different alerts for different failures; these three cards are enough here.
Check it worked
Section titled “Check it worked”The flow’s All Runs tab is the place to look: a duration chart over time, then a table of runs with who or what started them — your name for a manual run, scheduled run for the schedule — plus duration and status. Expand a run to see its phases.
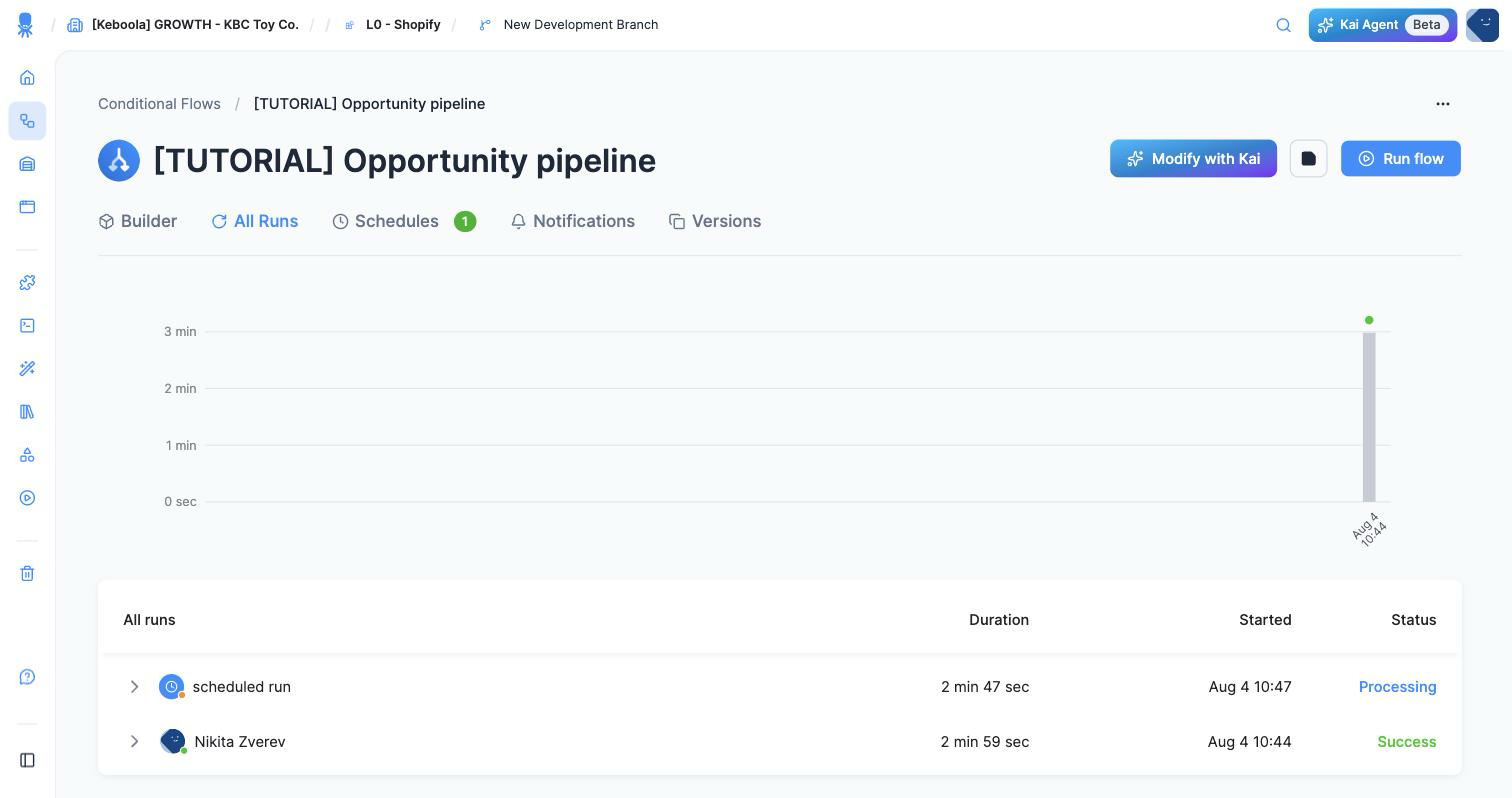
- One run with status Success. End to end this pipeline takes around three minutes, most of it the four HTTP fetches.
- Jobs lists more entries than you might expect: a job per task, a Conditional Flows phase job per phase, and the Conditional Flows job for the run itself. That is normal.
- The Schedules tab shows a count, and the schedule can be toggled off without deleting it.
If it goes wrong
Section titled “If it goes wrong”- The transformation fails inside the flow but works on its own. Its phase is running before the load finishes — check that the connector sits in an earlier phase, not the same one.
- Everything succeeds but the sheet is unchanged. The destination ran before the transformation wrote its output, or its phase is missing entirely. Read the run detail top to bottom.
- The scheduled run never happens. The schedule was saved but the flow is disabled, or the project is out of runtime credits — Free Plan projects get up to 60 minutes a month, and while flow jobs themselves consume none, the component jobs they start do.
- Jobs queue instead of running. Too many parallel tasks in one phase; Storage jobs are typically capped at 10 in parallel. Split the phase.
- The run detail is a wall of jobs and you want the short version. Ask Kai, which reads all of
them:
My flow run failed. Which task failed, and why?
Ask it the question you started with
Section titled “Ask it the question you started with”You built all of this to answer one thing: how close to your coast an octopus lives, and how deep down they really go. The atlas is in Storage and the sheet is in Drive — and nobody has actually said the answer out loud yet.
That part is Kai’s other job. Everywhere else in this guide it stood in for your clicking; here it reads what you built. Querying a table and calculating a metric is Data Exploration, and it needs nothing set up. Nothing below changes the project either: reading is what Kai’s read-only tools do, and those are allowed without asking by default — so expect an answer rather than an approval dialog, unless this project’s tool permissions have been set to ask. This is the whole interaction, sped up four times:
The one part of the question still open is “how close to your coast?” — a number is a poor answer to that. The last building step turns the atlas into a map anyone can open.
Next: Build the app →